Starting Android Programming
Step 1: Download android studio and basic software
To start you first step to creating android application, you need android studio which comes direct from google itself. There are other software that can create android application such as Eclipce and Basic4Android. But most suitable and user friendly is android studio.
Basic software you need:
1. Android studio
2. Notepad ++
3. Noxplayer (android emulator) faster than using android ADB
4. Photoshop or other photo editor
Install all the application that you needed
Step 2 : Creating your new project
Open your android studio after you installing all software
This what you see after you open android studio.
Click : File > New > New Project
Application name you can be change whatever you want no name it. For example "my first application" and click next
Now in SDK setting. For now we just using default setting and click next.
This all the activity or main page of your android application that generated by android studio for you. This is your first creating application though, you probably make something really simple and easy to understand. select the empty activity and click next.
Don't worry about this just click finish, because all this to configure your main page name.
This was the first thing you need to know about your android application where are the location java file, layout, and android manifest.
Go to the layout section and click activity_main.xml . There where you creating your main page layout design. first you drag the button icon to your page and it will create a button for you.
At the side of your layout there was a setting for your button. Two important you need to know for now is ID and text. Text view is for changing your button text and design and ID for declare which is your button. The id is important to know because after this maybe you have more than one button and need their own ID to make a difference function.
Creating new layout
Next right click on the layout and select new > layout resource file. make your layout name page_2
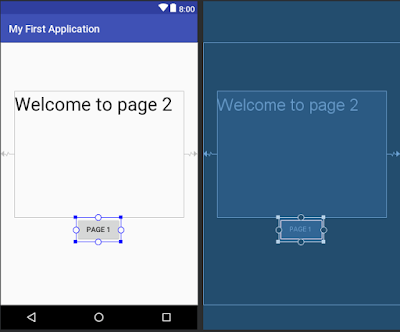
Add button and text view on page_2.xml and create new ID for button in this page as button2
Creating new class
right click in the class folder, select new > new class and name the class Page2
Time to insert some code :
MainActivity :
package com.example.acer.myfirstapplication;
import android.content.Intent;
import android.support.v7.app.AppCompatActivity;
import android.os.Bundle;
import android.view.View;
import android.widget.Button;
public class MainActivity extends AppCompatActivity {
@Override
protected void onCreate(Bundle savedInstanceState) {
super.onCreate(savedInstanceState);
// which layout will this java class open
setContentView(R.layout.activity_main);
// declare the buttton ID
Button button = (Button) findViewById(R.id.button);
//button coding for to another page
button=(Button)findViewById(R.id.button);
button.setOnClickListener(new View.OnClickListener() {
public void onClick(View v) {
Intent intent = new Intent(MainActivity.this, Page2.class);
MainActivity.this.startActivity(intent);
}
});
}
}
Page2 :
package com.example.acer.myfirstapplication;
import android.content.Intent;
import android.os.Bundle;
import android.support.v7.app.AppCompatActivity;
import android.view.View;
import android.widget.Button;
public class Page2 extends AppCompatActivity {
@Override
protected void onCreate(Bundle savedInstanceState) {
super.onCreate(savedInstanceState);
// which layout will this java class open
setContentView(R.layout.page_2);
// declare the buttton ID you using
Button button2 = (Button) findViewById(R.id.button2);
//button coding for to another page
button2=(Button)findViewById(R.id.button2);
button2.setOnClickListener(new View.OnClickListener() {
public void onClick(View v) {
Intent intent = new Intent(Page2.this, MainActivity.class);
Page2.this.startActivity(intent);
}
});
}
}
Add the highlight line in your android manifest. each class you created need to be declare in android manifest
Code: <activity android:name=".Page2"/>
Now open Noxplayer and run the program
Source code : Link


Comments
Post a Comment